

 |
Invoicing - Data Entry
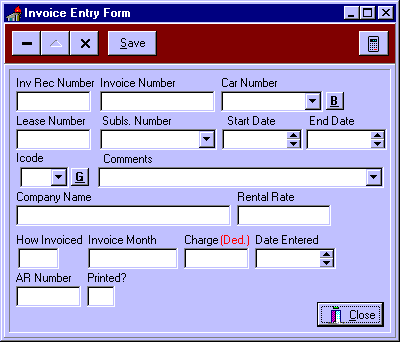
The main data entry form for Invoicing is similar to entry forms elsewhere in the application. One major difference is in the NAVIGATOR BAR. In invoicing, the only navigation choices are delete record, edit record, and cancel edit. Due to the amount of processing needed for each invoice record, data entry is tightly controlled. You can only deal with or see one record at a time in the invoice entry form. To see multiple records, use the Invoice Entry or Invoice History view GRIDS under the SUPPORT TABLES choice in the main invoicing form.

If you look at the invoice entry form, you'll see that there are down arrows next to car number, sublease number, Icode (or invoice code), and comments. The down arrow indicates that LOOK UP HELP is available. The Start date, End date, and Date Entered fields have both up and down arrows. These are "spin buttons" that allow you to increment the date or reduce it one value at a time.
Spin Buttons
When you first enter a date field with a spin button, if a date is present selecting the up arrow will advance the month by one month. However, if you highlight the day portion of the date, selecting the up arrow will advance the date by one day. Similarly, if you highlight the year portion of the date, selecting the up arrow will advance the date by one year. In addition, you can press the space-bar several times to enter today's date.
The 'G' Button
The invoice code and comments fields also have look up help and the invoice code field has a "G" button that allows you to enter a "generic" comment describing the current invoice code. For example, selecting BO (for Bad Order) from the Icode drop-down box will place the invoice code BO in the Icode field. Pressing the G button will place the generic comment "Bad Order" in the Comments field.
The 'B' Button
The 'B' Button next to the Car Number field allows you to drop-down a BADORDER lookup table and automatically enter data from the BADORDER table. Once the sublease number from the bad order table is entered, the system looks up additional information from the SUBLEASE table and enters it for that sublease.
You will find it convenient to begin each invoice entry by selecting the down arrow in the car number field. This will display a drop-down list of car numbers from PROFILE (or BADORDER using the 'B' option described above). There are several ways to select a car number from the drop-down list. You can use your page up and page down keys to move around the lookup table, you can use the slider control in combination with your mouse to quickly move about the table, or finally you can begin typing a car number. The system will begin searching on the first character you type and "home in" on the desired car as you continue typing. When the car you want is highlighted, just select it with the mouse. Selecting a car in this fashion will fill in all of the following fields: CAR NUMBER, LEASE NUMBER, SUBLEASE NUMBER, START DATE, END DATE, ICODE, COMMENTS, and AR NUMBER (Accounts Receivable Number).
Your next entry should be the Sublease Number by selecting the drop-down box. This will fill all of the following fields: SUBLEASE NUMBER, COMMENTS, COMPANY NAME and RENTAL RATE. Note that the Comments field is over-written by this second operation. This allows you to select a comment from either PROFILE or SUBLEASE. In addition, you can also select a comment from the comments drop-down box. This gives you a great deal of flexibility!
The Charge Calculator
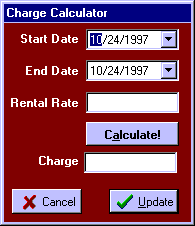
You can enter a Charge or (Deduction) in several ways. The simplest way may be to simply type the value into the Charge field. The system will also calculate the charge based on several factors. It will take into account whether the entry is monthly arrears or monthly prepaid, the current rate shown, and the values of the start and end dates as well as the Invoice Code selected. You can also in open the charge calculator by pressing the calculator icon the upper right hand corner of the Invoice Entry form. This will display the charge calculator form shown below.

The calculator is fairly simple to use. Just enter a Start Date, an End Date, and a rental rate and then press the calculate button or Alt plus A if you are using the keyboard. The system will calculate the correct charge. To "send" the calculated charge to the Invoice Entry form, press the Update button. Pressing the cancel button will return you to the invoice entry form without updating the charge field. Note that the Start Date and End Date fields on the charge calculator have down arrows. Selecting the down arrow will pop-up a calendar allowing you to select a date. Of course, you can always type in the date you wish to enter.
The 'Save' Button
After you have completed your entry, select the Save Button. The system will check the current
entry to ensure that all important fields have been filled. For example, if you try to enter a Sublease End invoice code, but you do not supply an end date, pressing the Save button will result in a message telling you that 'You must enter an End Date for this invoice code'. When you see such a message, simply select OK to continue or press Enter. In most cases, the system will then position the cursor on the field in question.


 |